
17 min read
These Easy Christmas Tree Desserts bring a little extra holiday magic to your dessert table without requiring complicated decorating skills. From flaky cinnamon puff pastry trees to fudgy brownie bites, creamy green cupcakes, and no-bake waffle cone treats, these festive recipes are designed to look special while staying manageable in a home kitchen.
If you are searching for Easy Christmas Tree Desserts for a holiday party, family gathering, or Christmas baking afternoon, this collection gives you five different ideas to try. Each dessert has its own texture, flavor, and decorating style, so you can create a colorful spread without making five complicated recipes.
The best part about these Easy Christmas Tree Desserts is that they use familiar ingredients and straightforward steps. You do not need professional pastry equipment or advanced decorating experience. Some can be prepared ahead, while others are fun to decorate with children. You can choose a baked recipe, a no-bake option, or a combination of both depending on your holiday schedule.
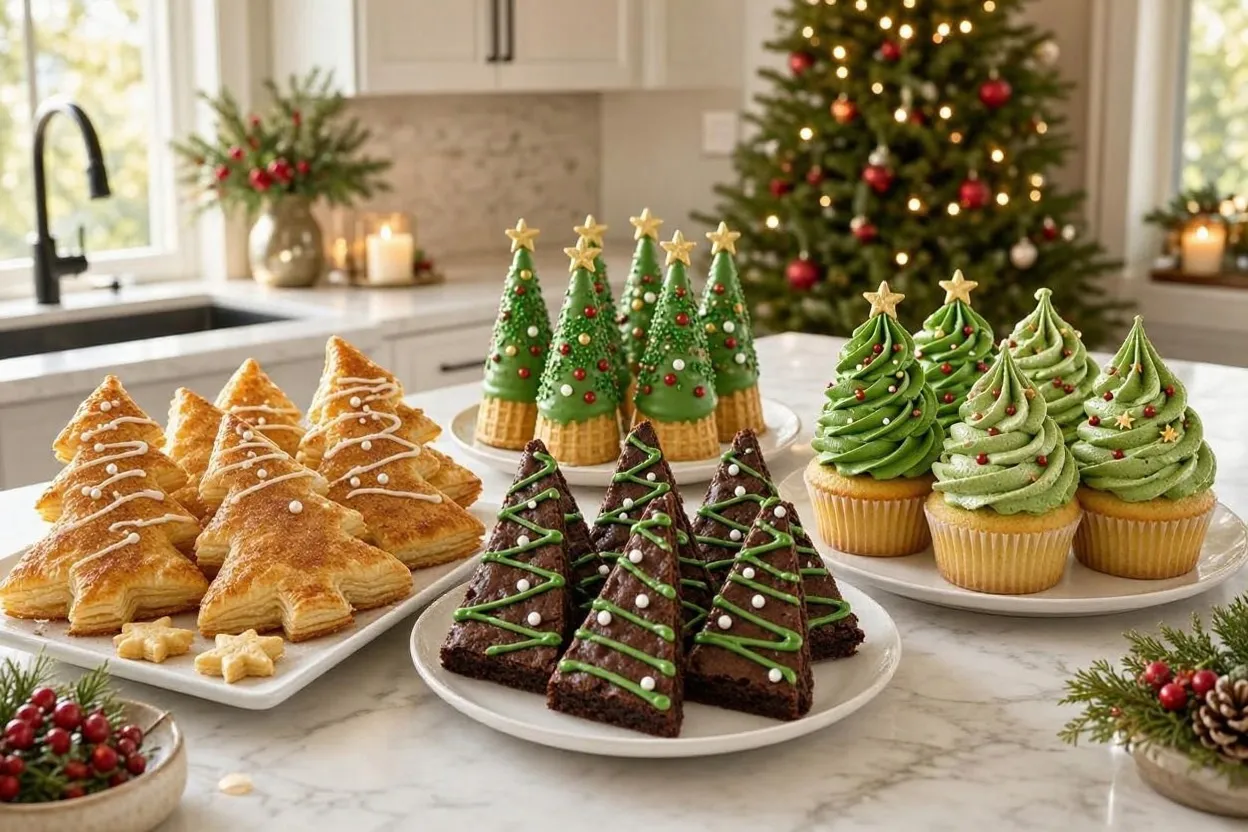
5 Easy Christmas Tree Desserts to Make This Holiday
These Easy Christmas Tree Desserts are suitable for different occasions, from a small family celebration to a larger Christmas dessert table. Each recipe makes approximately 12 individual treats, making it easier to estimate how much to prepare. The variety also makes this collection useful when you want several different Christmas tree dessert ideas on one serving table.
| Dessert | Total Time | Yield | Difficulty |
|---|---|---|---|
| Cinnamon Puff Pastry Christmas Trees | 40 minutes | 12 trees | Easy |
| Fudgy Christmas Tree Brownie Bites | 2 hours 50 minutes | 12 brownies | Easy |
| Christmas Tree Cupcakes | 1 hour 55 minutes | 12 cupcakes | Easy |
| No-Bake Waffle Cone Christmas Trees | 45 minutes | 12 trees | Very easy |
| Christmas Tree Meringues | 2 hours 45 minutes | 12 meringues | Easy |
1. Cinnamon Puff Pastry Christmas Trees
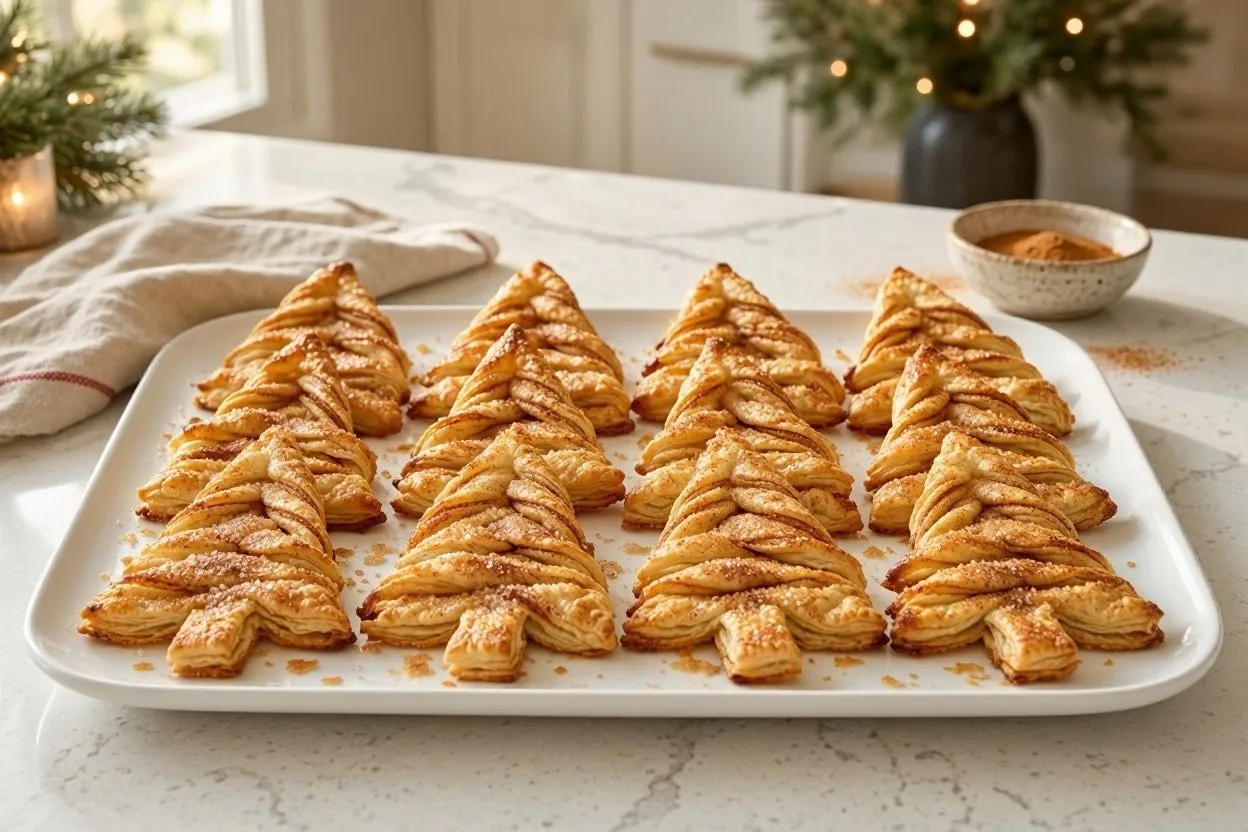
These cinnamon puff pastry trees are among the simplest Easy Christmas Tree Desserts to prepare. Frozen puff pastry turns into golden, flaky treats with crisp edges and a sweet cinnamon-sugar coating. Their twisted branches create a recognizable Christmas tree shape without complicated decorating.
They are especially good when served slightly warm with coffee, hot chocolate, or a holiday dessert platter. You can prepare the pastry shapes ahead of baking and pop them into the oven shortly before guests arrive. If you need a quick addition to your Christmas dessert table, these pastry trees are a practical choice.
Ingredients
- 1 sheet frozen puff pastry, thawed (approximately 9 × 10 inches)
- 2 tablespoons unsalted butter, melted
- 3 tablespoons granulated sugar
- 1 teaspoon ground cinnamon
Pantry and equipment: A little all-purpose flour for rolling, parchment paper, and 12 short wooden skewers if desired.
Instructions
- Prepare the oven: Preheat the oven to 400°F (200°C). Line a large baking sheet with parchment paper.
- Prepare the pastry: Lightly dust your work surface with flour. Unfold the thawed puff pastry and gently roll it into an even rectangle if needed.
- Add the cinnamon sugar: Brush the pastry with melted butter. Mix the granulated sugar and cinnamon in a small bowl, then sprinkle the mixture evenly over the pastry.
- Cut the strips: Cut the pastry into 12 long strips. Fold each strip back and forth into a tree shape, making each layer slightly shorter than the one below it.
- Insert skewers if using: Carefully thread a short wooden skewer through the center of each tree. Leave enough space at the bottom to hold it comfortably.
- Bake: Arrange the trees on the prepared baking sheet, leaving space between them. Bake for 16–20 minutes, or until puffed and golden brown.
- Cool and serve: Let the pastry trees cool on the baking sheet for about 5 minutes before transferring them to a serving platter.
Tips for the Best Puff Pastry Trees
- Keep the pastry cold while shaping it. Warm pastry can become difficult to handle.
- Do not add too much flour, as it can make the finished pastry less delicate.
- Leave enough space between the trees so the pastry can expand in the oven.
- For the crispest texture, serve on the day they are baked.
Storage
Store completely cooled pastry trees in an airtight container at room temperature for up to 2 days. Reheat briefly in a 300°F oven to refresh their crispness. Avoid refrigerating them because moisture can soften the pastry.
2. Fudgy Christmas Tree Brownie Bites
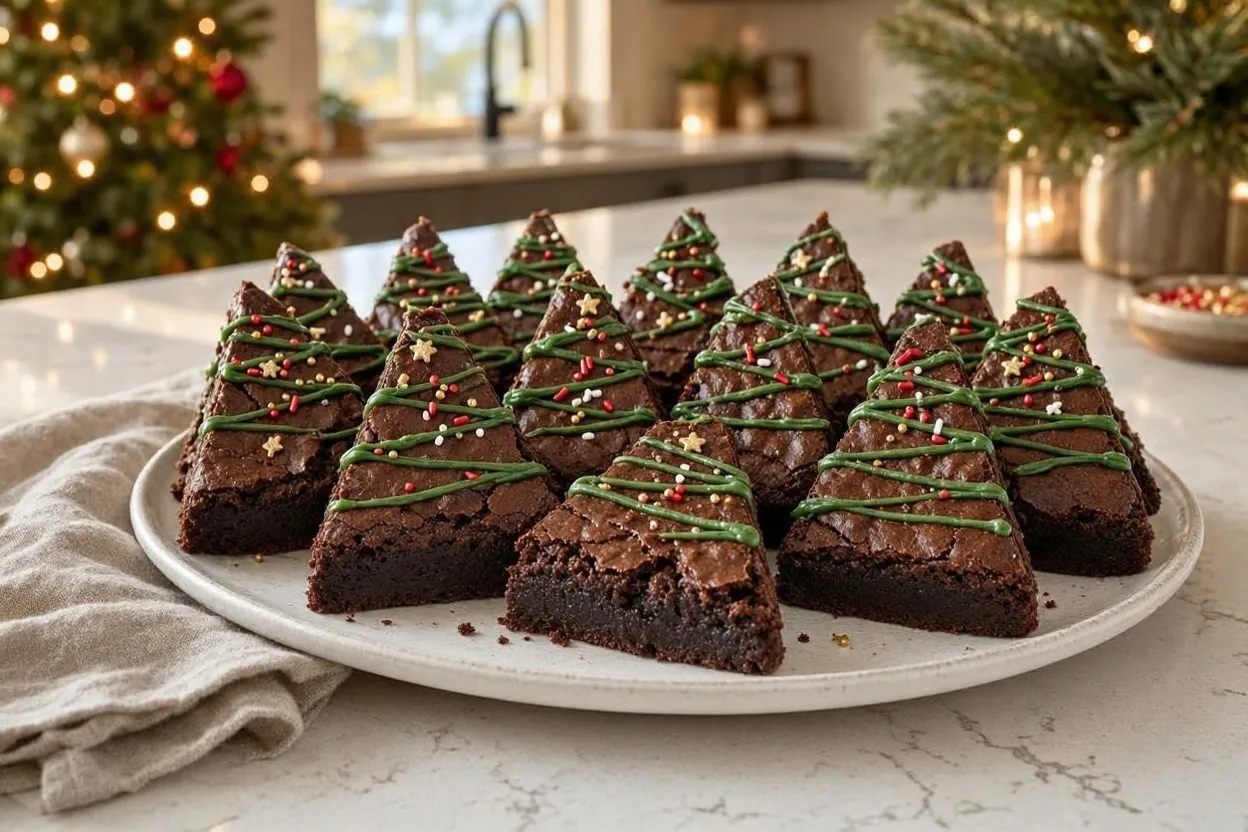
If you love chocolate desserts, these fudgy brownie bites are a delicious addition to your collection of Easy Christmas Tree Desserts. A rich chocolate brownie is baked in a pan, cooled, and cut into triangular pieces. A simple zigzag of green decorating icing transforms each brownie into a little Christmas tree.
The brownie base is soft and chocolatey, while the icing and colorful sprinkles add a cheerful holiday finish. This is also a convenient make-ahead dessert because the brownies need time to cool and chill before cutting. These chocolate Christmas tree treats are especially useful when you want a dessert that can be prepared before party day.
Ingredients
- ½ cup unsalted butter
- 1 cup semisweet chocolate chips, divided
- ¾ cup granulated sugar
- 2 large eggs
- 1 teaspoon vanilla extract
- ¾ cup all-purpose flour
- ¼ cup green decorating icing
- 2 tablespoons colorful holiday sprinkles
Pantry and equipment: ¼ teaspoon salt, parchment paper, and an 8-inch square baking pan.
Instructions
- Prepare the pan: Preheat the oven to 350°F (175°C). Line an 8-inch square baking pan with parchment paper, leaving some overhang.
- Melt the chocolate and butter: Place the butter and ¾ cup of the chocolate chips in a microwave-safe bowl. Heat in short intervals, stirring between each, until smooth. Let the mixture cool slightly.
- Mix the batter: Whisk the granulated sugar into the chocolate mixture. Add the eggs and vanilla extract, mixing until combined.
- Add the dry ingredients: Stir in the flour and salt just until no dry streaks remain. Fold in the remaining ¼ cup chocolate chips.
- Bake: Spread the batter evenly in the prepared pan. Bake for 22–25 minutes. A toothpick inserted near the center should come out with a few moist crumbs rather than wet batter.
- Cool completely: Let the brownies cool in the pan for about 1 hour. Lift them out using the parchment paper and refrigerate for another hour to make clean cuts easier.
- Cut into trees: Cut the brownie into 12 triangular pieces. Trim the edges if necessary to create neat tree shapes.
- Decorate: Pipe a zigzag of green decorating icing over each brownie. Finish with colorful holiday sprinkles and allow the icing to set for about 10 minutes.
Tips for Fudgy Brownies
- Avoid overbaking. The brownies should remain moist in the center.
- Chill the slab before cutting to get cleaner triangular shapes.
- Use a sharp knife and wipe it between cuts.
- Wait until the brownies are completely cool before decorating.
Storage
Store decorated brownies in an airtight container in the refrigerator for up to 4 days. Bring them toward room temperature before serving for a softer texture. Undecorated brownies can also be frozen in a well-sealed container for up to 2 months.
3. Christmas Tree Cupcakes with Green Buttercream
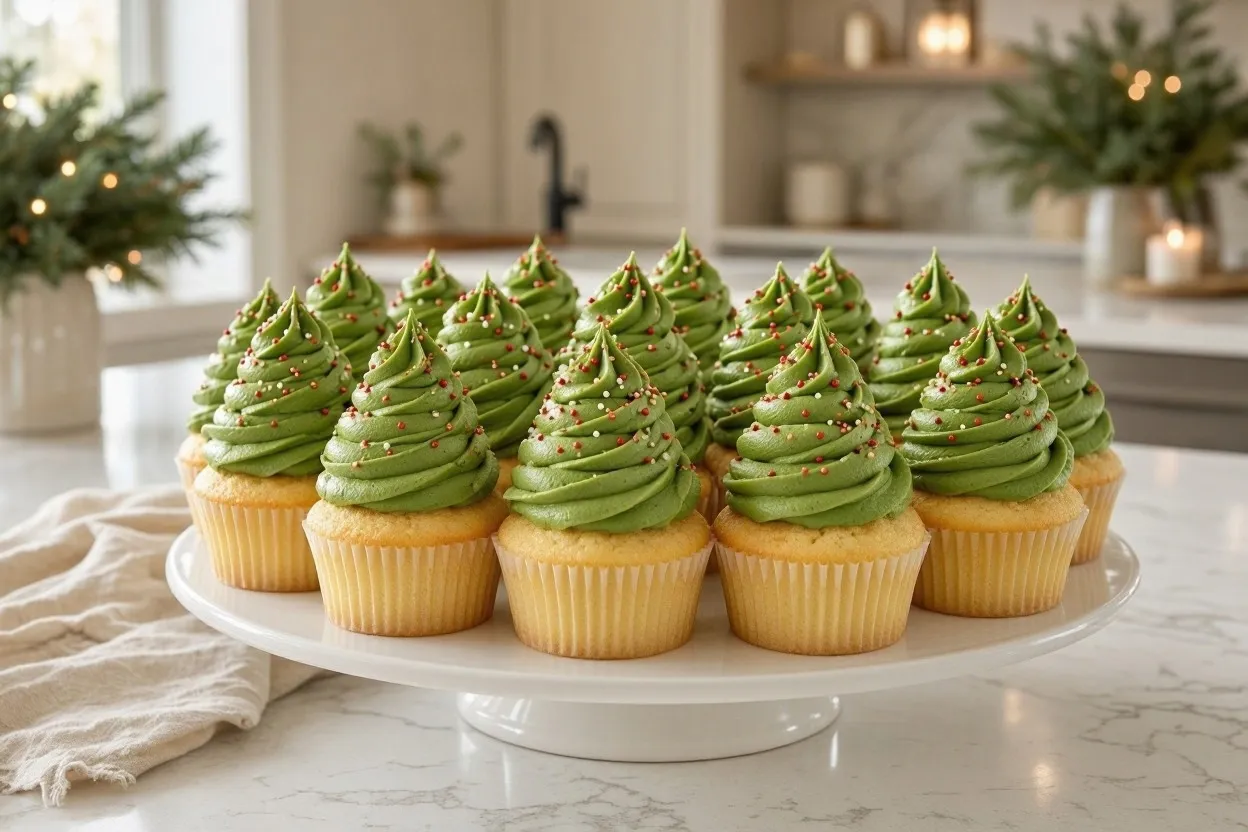
These Christmas tree cupcakes are colorful Easy Christmas Tree Desserts for anyone who wants a classic holiday sweet with a festive appearance. Soft vanilla cupcakes provide a simple base, while ready-made vanilla frosting makes the decorating process easier and quicker.
Tint the frosting green, pipe it into tall tree-shaped swirls, and finish with colorful sugar sprinkles. The result is a cheerful batch of cupcakes that looks right at home on a Christmas dessert table. Their familiar vanilla flavor also makes these Christmas tree desserts a crowd-friendly choice for children and adults.
Ingredients
- 1 box (15.25 ounces) vanilla cake mix
- 3 large eggs
- 1 cup water
- ½ cup vegetable oil
- 1 tub (16 ounces) vanilla frosting
- Green gel food coloring
- 2 tablespoons colorful holiday sprinkles
Pantry and equipment: 12 paper cupcake liners and a piping bag fitted with a large star tip.
Instructions
- Prepare the oven: Preheat the oven to 350°F (175°C). Line a 12-cup muffin pan with paper cupcake liners.
- Make the batter: Add the vanilla cake mix, eggs, water, and vegetable oil to a large mixing bowl. Beat according to the package directions until the batter is smooth and evenly combined.
- Fill the liners: Divide the batter evenly among the 12 cupcake liners, filling each about two-thirds full.
- Bake: Bake according to the cake mix package directions, usually 18–20 minutes, until a toothpick inserted in the center comes out clean.
- Cool: Let the cupcakes rest in the pan for 5 minutes. Transfer them to a wire rack and cool completely, approximately 45–50 minutes.
- Color the frosting: Place the vanilla frosting in a bowl. Add green gel food coloring a little at a time, mixing until you reach your preferred Christmas tree shade.
- Pipe the trees: Transfer the green frosting to a piping bag fitted with a large star tip. Starting at the outside edge of each cupcake, pipe upward in a spiral to form a tall tree shape.
- Finish: Sprinkle the cupcakes with colorful holiday sprinkles. Refrigerate briefly if the frosting needs to firm up before serving.
Tips for Decorating Cupcakes
- Make sure the cupcakes are completely cool before adding frosting.
- Use gel food coloring rather than liquid coloring to avoid thinning the frosting.
- Pipe from the bottom upward to create a taller tree shape.
- Apply the sprinkles immediately after piping, before the frosting forms a crust.
Storage
Store frosted cupcakes in a covered container in the refrigerator for up to 3 days. Let them sit at room temperature for approximately 20–30 minutes before serving. Follow the storage instructions on the frosting packaging.
4. No-Bake Waffle Cone Christmas Trees

These no-bake waffle cone trees are some of the easiest Easy Christmas Tree Desserts for families, parties, and anyone who wants a festive sweet without turning on the oven. Mini waffle cones become edible Christmas trees when coated in green vanilla candy melts and decorated with colorful sprinkles.
The cones provide a light, crisp texture, while the candy coating creates a smooth green exterior. Since there is no baking involved, this is a fun holiday project to prepare with children under adult supervision. If you need simple Christmas tree desserts with very little preparation, this no-bake recipe is an excellent option.
Ingredients
- 12 mini pointed waffle cones, approximately 2 inches tall
- 12 ounces green vanilla candy melts
- 2 tablespoons colorful holiday sprinkles
Pantry and equipment: Parchment paper and a little vegetable oil if needed to thin the melted candy coating.
Instructions
- Prepare the workspace: Line a baking sheet or tray with parchment paper. Arrange the mini waffle cones upright, using small cups or another stable holder if needed.
- Melt the candy: Place the green candy melts in a microwave-safe bowl. Heat in 20–30 second intervals, stirring after each interval, until completely smooth.
- Adjust the texture: If the melted coating is too thick for dipping, stir in a very small amount of vegetable oil until it reaches a smooth, workable consistency.
- Coat the cones: Carefully dip each waffle cone into the melted green candy or spoon the coating over the outside. Allow excess coating to drip back into the bowl.
- Add sprinkles: While the coating is still wet, scatter colorful holiday sprinkles over each cone.
- Let them set: Place the coated cones upright on the prepared tray. Allow them to set at room temperature for approximately 15 minutes, or until the coating is firm.
- Serve: Transfer the finished waffle cone trees to a platter and arrange them upright for serving.
Tips for No-Bake Christmas Trees
- Work with a few cones at a time so the candy coating does not harden before you add the sprinkles.
- Make sure the cones are completely dry before dipping.
- Use a holder to keep the cones upright while the coating sets.
- Do not overheat candy melts, as they can become thick or grainy.
Storage
Store the finished waffle cone trees in a cool, dry place in an airtight container for up to 3 days. Keep them away from humidity and direct sunlight to help preserve the crisp cones and firm candy coating.
5. Christmas Tree Meringues
Christmas tree meringues are light, crisp treats that add an elegant touch to a holiday dessert table. Their piped tree shapes look delicate, and their airy texture makes them a nice contrast to richer desserts such as brownies and cupcakes.
A low oven temperature helps the meringues dry slowly, creating a crisp outside. A little green gel food coloring gives them a festive appearance, while colorful sprinkles provide a simple finishing touch. They are a lovely final addition to a platter of Easy Christmas Tree Desserts and offer a lighter alternative to rich chocolate treats.
Ingredients
- 2 large egg whites, preferably pasteurized
- ½ cup superfine granulated sugar
- ¼ teaspoon cream of tartar
- Green gel food coloring
- 1 tablespoon colorful holiday sprinkles
Pantry and equipment: Parchment paper, a clean mixing bowl, an electric mixer, and a piping bag fitted with a large star tip.
Instructions
- Prepare the oven: Preheat the oven to 200°F (95°C). Line a large baking sheet with parchment paper.
- Prepare the egg whites: Place the egg whites in a completely clean, dry mixing bowl. Make sure there is no grease or egg yolk in the bowl.
- Start whipping: Beat the egg whites on medium speed until foamy. Add the cream of tartar and continue beating until soft peaks begin to form.
- Add the sugar: Gradually add the superfine sugar, one spoonful at a time, while continuing to beat. Increase to medium-high speed and whip until the mixture forms stiff, glossy peaks and the sugar is mostly dissolved.
- Add the color: Add a small amount of green gel food coloring and gently mix until the color is evenly distributed.
- Pipe the trees: Transfer the meringue to a piping bag fitted with a large star tip. Pipe 12 small tree shapes onto the prepared baking sheet, leaving space between them.
- Decorate: Add a small amount of colorful holiday sprinkles to each meringue before baking.
- Bake: Bake for approximately 90 minutes. The meringues should feel dry and lift easily from the parchment.
- Cool slowly: Turn off the oven and leave the meringues inside with the door closed for about 55 minutes.
- Serve: Remove the cooled meringues carefully and arrange them on a dry serving platter.
Tips for Perfect Meringues
- Use a clean, dry bowl and beaters. Even a little grease can prevent the egg whites from whipping properly.
- Add the sugar gradually rather than all at once.
- Use gel coloring sparingly so you do not add excess moisture.
- Avoid opening the oven frequently while the meringues are drying.
- Use pasteurized egg whites if serving people at higher risk from foodborne illness.
Storage
Store completely cooled meringues in an airtight container in a cool, dry place for up to 5 days. Moisture can make them sticky, so avoid refrigerating them. If the weather is humid, keep the container tightly sealed until serving.
How to Prepare Easy Christmas Tree Desserts Ahead of Time
Preparing a few parts of your dessert table in advance can make Christmas entertaining much easier. These Easy Christmas Tree Desserts do not all need to be made on the same day. The best approach is to choose recipes that hold their texture well and leave delicate decorations until closer to serving.
- One day ahead: Bake the brownies, cool them completely, and refrigerate them before cutting and decorating.
- One day ahead: Bake the meringues and store them in an airtight container in a cool, dry place.
- One day ahead: Prepare the waffle cone trees and keep them in a dry, airtight container.
- Several hours ahead: Bake the puff pastry trees and store them at room temperature. Refresh them briefly in the oven before serving if needed.
- Party day: Bake the cupcakes, let them cool completely, and pipe the green frosting shortly before your guests arrive.
How to Arrange a Christmas Tree Dessert Table
A beautiful holiday dessert table does not need dozens of different recipes. Combining different shapes, colors, and textures can make a small selection look generous and inviting. Arrange your Easy Christmas Tree Desserts at different heights to make the display more attractive and give every treat its own place.
- Choose a centerpiece: Place the green Christmas tree cupcakes or waffle cone trees in the middle of the table.
- Add height: Use a cake stand or tiered serving tray to create different levels.
- Balance the colors: Arrange golden puff pastry beside chocolate brownies and green desserts.
- Keep small treats accessible: Place meringues and brownie bites on easy-to-reach platters.
- Use simple decorations: Add a clean linen runner, a few evergreen branches, or small Christmas ornaments around the serving dishes.
For an attractive holiday spread, combine these Easy Christmas Tree Desserts with a few savory dishes and drinks. If you are planning a larger holiday menu, you can pair these treats with more ideas from our modern Christmas dinner food ideas collection.
Food Safety and Storage Tips
When preparing Easy Christmas Tree Desserts for a holiday gathering, safe storage is just as important as presentation. Some treats can stay at room temperature, while others need refrigeration depending on their ingredients and preparation. Plan where you will store each dessert before arranging the party table.
- Do not leave perishable food at room temperature for more than 2 hours, or 1 hour when temperatures are above 90°F.
- Keep cold perishable foods at 40°F or below.
- Keep hot foods at 140°F or above when serving them hot.
- Reheat leftovers to an internal temperature of 165°F.
- Use clean utensils and serving plates, and avoid placing fresh desserts on plates that held raw ingredients.
- For guests with food allergies, clearly identify ingredients and prevent cross-contact during preparation and serving.
These precautions are especially useful when your Christmas dessert table includes several different recipes. For more detailed guidance, consult the USDA food safety resources.
More Christmas Recipes to Try
If you enjoyed these Easy Christmas Tree Desserts and are building a complete holiday menu, explore these other Lifetrusty collections for more festive inspiration:
- Christmas cookie recipes for classic holiday baking and cookie exchanges.
- Simple easy no-bake Christmas desserts for a crowd when you need more party-friendly sweets.
- Modern Christmas dinner food ideas for planning the rest of your holiday meal.
Frequently Asked Questions About Easy Christmas Tree Desserts
Can I make Christmas tree desserts the day before a party?
Yes. Brownies, meringues, and waffle cone trees can be prepared ahead when stored properly. Puff pastry trees are best served fresh or refreshed briefly in the oven. Cupcakes can be baked ahead and decorated closer to serving time. This makes several of these Easy Christmas Tree Desserts convenient for holiday entertaining.
How many Christmas tree desserts should I prepare for 12 guests?
One batch of each recipe makes approximately 60 individual desserts in total. That is about five small treats per guest if everyone tries each variety. For a smaller dessert selection, two or three batches may be enough depending on your menu.
What is the easiest Christmas tree dessert to make without an oven?
No-bake waffle cone Christmas trees are one of the easiest options. You only need mini waffle cones, green candy melts, and holiday sprinkles. Coat the cones, decorate them, and let the coating set. They are a simple choice when you want Easy Christmas Tree Desserts without baking.
How do I keep Christmas tree desserts from becoming soggy?
Store crisp treats such as puff pastry and meringues in airtight containers in a cool, dry place. Keep them away from humidity and avoid refrigerating them unless their ingredients require it. Store frosted cupcakes and other perishable desserts according to their storage requirements.
Can I freeze these Easy Christmas Tree Desserts?
Brownies can be frozen before decorating and thawed in the refrigerator. Cupcakes can also be frozen without frosting. Puff pastry, meringues, and decorated waffle cone trees are best prepared fresh or stored according to their individual instructions because freezing can affect their texture.
How long can Christmas desserts stay on the party table?
It depends on the ingredients. Perishable desserts should not remain at room temperature for more than 2 hours, or 1 hour when the temperature is above 90°F. Keep cold perishable desserts refrigerated until serving and return them to refrigeration promptly.
Final Thoughts on Easy Christmas Tree Desserts
These Easy Christmas Tree Desserts make it simple to add a festive touch to your holiday celebrations. Whether you prefer flaky cinnamon pastry, rich chocolate brownies, colorful cupcakes, no-bake waffle cone treats, or delicate meringues, there is an option for different tastes and baking schedules.
You can prepare several recipes ahead, involve the family in decorating, or choose just one or two favorites for a smaller gathering. Arrange your Christmas tree treats on a serving table with a little greenery and holiday color, and you will have a dessert spread that feels special without making the day unnecessarily complicated.
Save these Easy Christmas Tree Desserts, gather your ingredients, and enjoy making something sweet this Christmas! Whether you are hosting a large party or planning a quiet family celebration, these festive Christmas tree treats are a fun way to make the season feel even more special.
This article follows our editorial and sourcing standards. Recipes are for informational purposes only — see our Disclaimer.
Looking for kitchen inspiration? Our partner programs bundle recipe collections, meal planners, and shopping lists — for everyday meals at home.
Browse more recipesSponsored · Prices may change